Wednesday, 31 May 2017

THE RIGHT WAY TO HOLD YOUR DRUMSTICKS


Learn How To Hold Drumsticks

Learning the right way to hold your drumsticks is one of the most often neglected aspects of drumming. When you play the drums, the stick should become a part of you, and not an accessory. To achieve this, you must start with the way you hold your sticks. It is important to determine the correct grip style early on, so you do not end up hurting yourself, or you’re training in the long run. Now don’t worry, if you have not been following the “correct” technique at all, it’s not the end of the world. Any way you practice will improve your skill; however, holding your stick different ways will increase your drumming productivity by offering more bounce, movement, and control.

Matched Grip
The most popular style is the Matched Grip. With this, both hands hold the stick the same way. Matched grip is very popular with all styles of drumming, and can be applied in more than just the drum kit. Timpani, mallets, and other percussion instruments use the matched grip as well. It allows for fast movement around the kit, and offers maximum control. 

This grip is played with your palms facing downward. every finger tip is lightly rested on the drumstick. Make sure you do not grip the stick too tightly, or you will limit its’ rebound. It is debated which finger is used to grip the stick. Some will use their thumb and index finger; others will use their thumb and middle finger. Both are fine, as long as you chose one early and stick to it!

Traditional Grip

The next grip we will look at is called the traditional grip. You may see a lot of jazz drummers using this style, for it is extremely popular with that style. With this, you hold the stick with your palms facing up, gripping the stick from underneath. This gives you a whole new feel of the stick. It allows for quick strokes, and better dynamic control; Perfect for brushes and brooms. One problem with this grip is moving it around the drum kit. With a bigger drum kit, you may find it hard to move quickly around the toms, and with the angle of the stick in your hands, hitting cymbals can be tricky. 

To achieve this grip, simply start by sticking your first two fingers out, with your thumb sticking straight up. Then simply place your stick between your thumb, and your other fingers 
After the stick is in place, simply close your top two fingers gently on the top of the stick. The stick should be loose in your hand.


French grip

Finally, there is the French grip. This technique is not as popular, but is still used a lot. It offers speed and endurance, with a totally different feel than any other grip. The French grip uses your fingers to control your stick. Because you do not use your wrists as much, you will save a lot of energy. Using your fingers can be a great plus; however, it does have its minuses. You may find it hard to get enough power in some of your strokes. 
 the stick is very lose in the hand. It’s a good idea to use your index finger and thumb to pinch the stick. You want to be able to use your other fingers to act as a spring on the stick. 

Be sure to try out every one of these techniques. Each grip is different and have their own benefits. If you are educated in all styles, you will be much more attractive as a drummer. Remember, these are not the only ways to grip your stick! There are many varieties of these basic techniques. These are just examples of the three most common ways to hold your drum sticks!

DEVELOP HAND SPEED, POWER AND CONTROL


Develop Drum Hand Speed, Power, And Control!

There are three basic ways to play the drum kit with your hands. You can play each stroke using your wrists, your fingers, or combinations of both. In this particular lesson, we're going to go over the wrist technique and the advantages it offers. In the weeks ahead I'll follow this lesson up with two more covering finger techniques and combinations of wrist and finger techniques.
Why Use Wrists For Drumming?

Most people don't rush out of the gate with all sorts of amazing finger-technique, and thus they have to start with the basics. Playing with your wrists comes fairly naturally for most people, so it's an obvious starting point.

However, I would argue that maintaining wrist speed, power, and control is extremely important - even after you have learned to play finger techniques. There are a number of good reasons to develop and eventually combine both methods.

One thing many people overlook is that you get significantly more power when playing with wrists. Playing double stroke rolls on a low floor tom, for example, just doesn't sound right when played with finger-based techniques. Wrists provide the full power, and control necessary to make that roll sound clean.

Developing speed in your wrists also allows you to do more with finger-based techniques when you combine both elements together. I always try to keep my wrist speed as close to my finger speed as possible. Later, when you begin playing advanced techniques like the Moeller method, you will begin to see why this offers such an advantage.

Practicing The Drums With Wrists
Sometimes it can be hard to tell if you are truly playing using only wrists. It's easy to begin bouncing the stick a little in a double stroke roll, or using some finger technique in a simple paradiddle pattern. That's why I would recommend you spend some time practicing on a non-rebound surface. You can use something simple like a pillow, or a professional RTOM workout pad. Either way, as long as you can practice on something that offers very little or no bounce - you're good to go.

Practice playing singles (r,l,r,l,r,l,r,l), doubles (r,r,l,l,r,r,l,l), or paradiddles (r,l,r,r,l,r,l,l) along to a metronome. Set the speed fairly low and just focus on control. This is extremely important. Many drummers that want to develop speed start turning up the metronome way too fast. It is vital that you develop control over speed when first learning. Speed will come automatically once you begin to develop control over your wrists with these various patterns. Trying to shortcut control by focusing on speed will only hold you back. I've seen it over and over. Do NOT make this mistake.

Focus on staying relaxed and playing things perfectly in time with the click. Breathe deeply while you play, and work towards building muscle memorization. Train your muscles to play things right the first time and you will save years of corrective practice down the road.
Building Speed and Endurance

Once you have begun to develop your technique with solid control - then you can begin to develop speed and endurance. This is done best through repetition and controlled "burn through" exercises. Like a trained athlete - you need to push your muscles to the next level without losing control.

Start by playing singles, doubles, or paradiddles as sixteen notes at 100 BPM (or a moderate speed of your choice). Slowly move up in increments of 5 BPM until you are playing at about 50 BPM faster than when you started (in this example - 150 BPM). Spend some quality time at each speed - only increasing the metronome when you have played for a few minutes with complete control.

You may very well be able to play significantly faster than 150 BPM at the time, but that isn't the point. You want to develop control at all speeds, and the ability to play for extended periods of time. When you return to repeat the exercises (a day later perhaps), try starting out about 20 BPM faster than your last start point. Repeat and only progress to 50 BPM faster than the new starting point.

It may seem like a slower method of mastery, but it pays off in the long run. Don't rush through exercises or think that a particular speed offers no value to you. Dedicate two weeks to these exercises and see the results you get with daily improvements. I'm sure you will be pleased.

WHAT A BAND LOOK FOR IN A DRUMMER


Learn What Bands Look For In A Drummer

I am a firm believer that some of the best drummers in the world will never be discovered. This is because they are lacking certain qualities that bandleaders are looking for. Usually a bandleader will try out a drummer for a single practice or gig, and only call them back if they make a good first impression. Here, in no particular order, are 10 things you can do to make that better first impression:

1. Don't be late!

When you are late for a gig you get labeled as unreliable. If you are ever late or are going to be late, make certain you call the leader and explain the circumstances, and apologize for the inconvenience you are causing other affected parties. When you are late you are wasting valuable set-up, sound check, and practice time. The easiest way to ensure you are on time is to plan to be 30 minutes early.

2. Know the music

Listen and learn all the music for the gig you are playing at. If you are playing all original and un-recorded music than you should listen to the artists previous recordings and get a feel for what style of drumming they like.

3. KISS - "Keep it simple stupid."

Don't think that you need to show everyone how fast you can move around the kit. Most leaders are more concerned with "groove". If the song has no groove it becomes very hard to listen to for the crowd and even harder for the other musicians to play with.

4. Attitude

Always express how happy and excited you are to play with whomever you are playing with. If the leader thinks that playing with him is a burden to you he will not call you anymore. Get to know your fellow musicians who you are sharing the stage with. Even if you don't like some of them you must be nice. You want to build a good relationship with everyone.

5. Playing with a click

You must know how to play with a click. You don't want to have to stop in the middle of the song because the drummer can't keep the beat. I do not recommend playing every song with a click. When you are comfortable playing with a click then you can focus more on groove and not be worried about staying on time with the click.

6. Playing what they want

Sometimes you will have to play a groove that you think doesn't suit the song. You might be playing a groove that the leader tells you he doesn't like and asks you to play something else. Instead of throwing your sticks at him and telling him where to put them I recommend just playing the song the way they want it. You can play whatever you want when you go home at the end of the night with your paycheck. You can also pay the rent the too.

7. Monster Kit

I am a big kit type of guy, but it doesn't always work with every circumstance. Don't plan on taking up the whole stage with your huge ass kit. If you know that there is a big stage with lots of channels for mics and lots of room for other musicians than fly at it. However, if there is limited space then bring a smaller kit. The sound guys will love you more too.

8. Sensitivity

Don't play so loud! This is a mistake that too many drummers make. If the leader cannot hear his guitar or vocal and his monitor is cranked then there is a problem. Listen to the sound in the room and then you can make a decision about how you are going to play or what type of sticks you are going to use. It works both ways, I have been told to play quieter and I have also been told to play louder. Of course I like it way more when they say "LOUDER!", but don't get your hopes up...You should be able to play the drums with dynamics.

9. Memory

If you cannot remember all of the 2/4 bars, 7/8 bars, and 15/16 bars along with all the other parts that leaders want to add to their songs - you must write it down. There is nothing worse than going through a part of a song in practice if you just forget it when it comes time to play it in front of a crowd. If you do, your only hope is that you have an understanding leader. I hate the nasty looks from the head honcho after I miss a important part.

10. Play for fun, not for money

Everyone has to make a living, and I am not saying to just play every gig for free. However, that cannot be the only motivation for you playing the gig. If a leader senses that you are just in it for the money he is not going to want you back. Only ask for the check right when you are about to leave. Do not ask for payment prior to playing the gig.

Follow these guidelines and you're sure to have improved success in seeking regular gigs. With any luck you'll form some great relationships along the way. Good luck!

Tuesday, 30 May 2017

HOW TO PRACTICE SINGING: 10 WAYS


How Singing Practice Works


The old expression practice makes perfect certainly applies when it comes to singing.

Developing good singing techniques during your practice sessions will enable you to carry such develop skills into your performance.
Learning to sing takes considerable time, effort, and especially dedication. Devoting such time to expanding your singing abilities is a necessary requirement.
Not only repeating your chosen singing materials, but also rehearsing things like breathing exercises, mouth shapes, and various scales will help you perfect and hone in your singing voice.
As you develop these critical skills, they will play a major role in the foundation of great tone, pitch, clarity, and projection.
Make sure to set goals from the very start of your practice times. Commit to learning and doing what is necessary to nurture a great singing voice.

The Top 10 Ways To Practice Singing


If you are looking to get the most out of your practice sessions when singing, please consider some of the following suggestions below:

1. Your Location is Key. Before you begin any kind of singing practice session, you will want to locate an area of the house where you can have privacy and will not bother others.
Make sure you give yourself some space to move around and that’s open enough to carry the sound throughout the room. No dead space if you can help it.

2. Warm-up first. Always take the time to warm up your vocal apparatus. This includes stretching your body to relieve any tension, and of course warming up the vocal cords by including hunting exercises and practicing scales.
You should spend at least 10 to 15 minutes warming up prior to each singing practice session in order to prepare the body and vocal cords for their workout.

3. Use a mirror. Find a mirror in your bedroom, bathroom or closet and stare into it. Notice your posture, your breathing, and the position of your head.
It is important to pay close attention to the mechanics of your body when singing. Using a mirror can be a great way to monitor such things as your posture and the positioning of your mouth, making adjustments accordingly.

4. Connect your emotions. During practice, take the time to think about the premise of the song your singing. What is the feeling that is being created? Now ask yourself how you would express those feelings, and put them into your song while singing. Close your eyes and as you sing feel the words and the sounds, allowing yourself to connect to them.

5. Lie down while singing. Locate an empty space on the floor. Gently lie down on your back, arms to their sides, with your back flat on the floor. Keep your body parts aligned. Begin singing randomly, noticing the movements of your breath and diaphragm.
After giving you this a few minutes practice, try standing up now, close your eyes and imagine that you are in the same position you were while lying on the floor. This is the kind of posture we are looking for what we are singing. Your body will be perfectly straight allowing airflow without any restriction.

6. Break your songs down. When tackling a song, rather than rehearsing the entire song from start to finish. Why not break the song into parts, thus focusing on trouble areas first. As you work through each problem area, you can gently blend all the pieces together in harmony.

7. Learn the messa divoce technique. In Italian this means the placing of your voice. It’s basically a simple technique in which you take a single pitch all the way up to a crescendo. Then down into a diminuendo. You begin singing quiet and then work up to louder volume, and then quiet again all the time using the same pitch.

8. Get your timing right. Get yourself a metronome. Better yet, there are many apps you can choose from that are free.
Even if your pitch and tone are perfect, when your timing is out is very noticeable. Timing is a very important aspect of your singing practice sessions.
Especially when articulating and pronouncing words according to the tempo of the song similar to how it was written. You must stay in time.

9. Record your sessions. There are some fantastic personal recording studio mics on the market. But if you’re on a free budget, we recommend just using the microphone on your smartphone.
The idea is to enable you to review your practice sessions. Taking note of such things as your pitch, your tempo, your tone, and other areas you wish to improve on.
If you want to take it a step further, you can even video record yourself with a camcorder or your cell phone. This way you can even get a look at your posture and see if you can make adjustments in that area as well.

10. Hit more notes per breath. Being able to sustain notes for longer periods of time are the very foundations of the great singing voice. With that being said try the following exercise.
Take the deepest breath you can comfortably take and hold. Slowly control your exhalation using your diaphragm and muscles.
Move up and down a scale in order to incorporate supporting muscles while moving through the various registers.
Focus on the proper resistance of airflow while maintaining good pitch and a strong volume. Time yourself is necessary and continue to challenge yourself.

HEAD, CHEST AND MIDDLE VOICE


Head, Chest, And Middle Voice


There are three main contributors where your voice resonates and produces sensations:

> The Chest Voice: This is the sensation for low, warm, and rich notes which you can feel in your chest, throat, and mouth. It’s the voice we commonly use to speak with, unless you talk like Mickey Mouse.

> The Head Voice: This is the sensation for higher, brighter notes, in which the vibrations feel like they have moved from your throat and mouth, up through your soft pallet and traveled even further back and higher up, so that they are coming from the top or back of your head.

> The Middle Voice: As well as chest and head voice, we can alter resonance by placing sounds forwards. This allows for us to brighten tone by resonating notes around our cheekbones and either side of the nose, which is commonly referred to as the mask.

Using these resonating areas is what brings your voice to life. If you force the sound straight out of your mouth, it will sound dead and colorless. By focusing and mentally directing the sound, it will go there.

The goal of any singer should be to develop a voice that is clear and even, from the chest voice, up through the head voice. Many singers fear this transition. No fear, it’s simply a matter of blending and combining the joins, which we know as the middle voice.

It is much more beneficial for the long term health, agility, and appeal of your voice to blend the voices rather than reaching for notes that are too high for your chest voice.

Try singing from low to high, feeling the sound traveling out of your chest, while avoiding the larynx from tightening up. Stay relaxed and visualize the sound moving into the space in the high back of your throat.

From here you should be in a mix between your chest and head voice, your middle voice. As you sing higher, direct the sound with your mind, into your head, and let go of your chest sensation.

IMPROVING SINGING TONE AND RESONANCE


Improve Your Singing Tone And Resonance

Improving your singing tone will depend on your understanding of the components that make up good tone and what produces bad tone.


Tone is described as, “a musical or vocal sound with reference to its pitch, quality, and strength.” according to Dictionary.com.

Tone or timbre (which is the quality of a musical note, sound, or tone that distinguishes different types of sound production). In this case we are describing the sound of your singing voice.


Tone Color

Tone color is the characteristic that allows us to distinguish the sound of one voice or instrument from another. Described by terms like warm, dark, bright, or buzzy.

For example: a violin and a piano can be played with the same pitch and volume, but produce different tones. A piano will have a warm tone, whereas a violin has a bright or shrill tone.

Tone is not to be confused with pitch and loudness.

Just as two different singers could be singing a song with the same loudness and pitch, you could still distinguish them from their tone.

It’s described as the color of your voice. Is it warm, dark, ringing, shrill, or bright?

The tone of your voice changes with your moods or the emotions you are trying to convey.

Our tone is created through resonance which we will discuss in more detail shortly.


Common Tone Issues


Common issues with creating the appropriate tone is either it’s too breathy due using too much air too quickly, or the tone is too tight as a result of tension, and the sound is therefore squashed and restricted.

There are 3 basic categories that sum up the most common tone producing mistakes:

> Throaty Voice: described as heavy, thick, and deep, low, and seems to come from deep in your throat cuased by a constricting of the throat.

> Nasally Voice: or hypernasality occurs when there is too much nasal airflow or a lack of appropriate nasal airflow during speech and particuliarly when singing high notes.There are some who enjoy the nasal sound. However, it is not generally considered to be a desirable tone.

> Breathy Voice: Better known as hypofunctional. This occurs when the vocal cords are held apart, allowing a larger amount of air to escape between them. This produces an audible breathy, airy sound. Like a balloon leaking air.

SONG WRITTING


What’s involved in writing a song? Is there a simple formula that even a beginner can apply in order to begin writing songs without experience?

Where should one start? What are the parts that make up a song?

What are the 4 basic elements of song writing and why are these so important?

To find the answers to these questions and begin writing your own songs – please consider the following:

Elements Of Song Writing

The purpose of this discussion is not to identify all of the technical aspects of song writing, nor is it to endorse only one way of accomplishing this.

We hope to provide some basic ideas to identify the parts that make up a song and provide a model for you to fill in your own music.

To illustrate: Compare the structure of a song to that of a house.

Regardless of the building materials, colors, size or dimensions, they all share common features.

An enterance and a back door exit. A kitchen, a bathroom,a bedroom, etc…

Similiarly, the parts making up a song may be constructured more than one way.

You as the architect will structure your song with the main components, while using the freedom of your imagination to shape and color it with emotion.


A song has four basic elements: words (the lyrics) are sung to a tune (melody) which is supported by chords (harmony) and played to a certain combination of beat and tempo (rhythm and timing).

Keep in mind that there are no hard and fast rules when it comes to song writing and the importance of each element will depend upon the style of music you from which you build your foundation. Choosing the order of these elements is entirely personal preference.

The Lyrics


Some prefer beginning with the words as it can be a great starting point in developing the theme to your song. The story or what have you can be the basis of the mood you are creating.

Try laying out the lyrics in the style of a poem, using breaks between so many lines.

Rhyming is important but not always necessary.

Make sure to keep a book or journal of lyric ideas, even if they’re not finished. You never know when you revisit that unfinished business, when inspiration will hit.

You need only one verse and a chorus to get the basic structure of a song – extra verses can be added later.

One common structure would be: intro – verse – chorus – verse – chorus – bridge – chorus – outro. There are of course many varieties to this pattern.

The Melody


The melody has been defined as “an agreeable succession of sounds , a sequence of single tones”.

In other words, these are the notes that carry the lyrics. If it’s simple, catchy, and you can hum it nicely, it may be a keeper.

Paying attention to the melody in the early stages in a composition will encourage you to compose a more effective tune.

If you are able to develop your tune in a way that has an expressive quality, some pleasing movement and a catchy hook – it will sound a lot better when all the rest is in place.

Think of any great song. In most cases the tune alone sounds catchy even without being accompanied by instruments.

Repetition is another important aspect of songwriting as a song is little more than a pattern of phrases better known as the “hook”.

The Harmony 


Perhaps you are one who chooses to construct an appealing chord progression first, followed by the melody. This is known as “from the middle out”. This approach is especially favored by guitarists.

Try finding your way around various chord sequences, be it whatever instrument you choose.

It’s fairly simple and it allows your mind to play with the words and melody. Chord sequences can inspire and suggest emotion or mood that can be focused through a lyric and melody.

Recall any of your favorite songs. Can you pick out the chord progressions? Minor chords are sometimes identified as sad or gloomy. Whereas major chords are bright and happy.

A simple way to understand them is remembering that each key has 7 notes. From the various notes we form a chord.

For example: a 1,4,5 chord progression would start with the first note of the scale as a chord, the four notes from the first as the second chord , and finally five notes up in the scale from the first note in the scale as your third chord.

Begin choosing any note within the major scale and give it a try. Many great folk songs for example are based on 3 basic chords like G, C, and D.

Rhythm And Timing


If you choose to begin writing with tempo in mind known as the “bottom up”, you may want to consider acquiring a drum machine or some kind of electronic beat machine.

Depending on the type of song you are working on, the tempo will be faster or slower. For instance, you are composing a song people will dance to, it will require strong rhythmic presence, whether fast or slow.

Try playing and singing against a drum rhythm to give your melodies a greater rhythmic presence. Treat the bass notes as the foundation of major and minor chords, since a single note in the bass can imply a number of different chords.

Timing is everything especially when playing. Steadily laying your notes down on your beats , while remembering your breaks and so forth. Make sure to record.
Parts That Make Up A Song


A song is broken up into different sections. As with our earlier illustration of a house, the seperate sections of a song are like the individual rooms that make up the whole structure.

> Intro: The introduction of a song. Basically a short musical solo based on the song’s verse, chorus, or bridge. A great intro will draw your listener in immediately.

> Outro: also known as “codas”. They may be as simple as a reprise of the of the chorus or a repeat of either the final line of the chorus, the reapeat of the verse, or the repeated singing of the final line of the song.

> Verse: This is where the song tells the story. Either chronologically or through a series of recollections, descriptions of events, or possibly emotions. The verse sets up the melodic, harmonic, and rhythmic patterns to the song.

> Chorus: Also known as the refrain, generally repeated throughout the song. It’s the hook that everyone loves to sing along to and is generally how the song is remembered. Mainly because the chorus is in most cases based on the song’s title.

> Bridge: If all there was to a song was the constant repetition of verse to chorus, chorus to verse and so on, the song would become boring. This is where the bridge comes in. It’s kinda like the climax of a story. The bridge normally intensifies to prepare the listener for the reaaproach of verse and chorus with a different view.
Putting It All Together

Now that we understand song writing structure and the various parts to a song, it a matter of allowing inspiration to lead us into ideas for song creation.

What are you interested in? Do you want to express your feelings, or share an experience? What kind of mood do you want to set? Who are your potential listeners?

There are no hard and fast rules to song writing as long as it can be communicated in a way that will bring pleasure to your listeners.

Stick to patterns as people love them. Especially if you have a great hook. If it’s a great chorus, people will want to sing along with you.

Have fun and be patient. Enjoy the process of making little revisions along the way as inspiration strikes.

8 vocal techniques

VOCAL TECHNIQUES


All of us have a singing voice, but not everyone has developed proper vocal techniques in order to be sure where to find or how to use that voice. Not convinced? Head out to a Karaoke Bar one evening. Chances are you’ll witness a variety of passionate singers out there. All of them showing their confidence and courage to express themselves publicly.

But let’s be honest, some are less pleasing to the ear than others, and we love them anyways! The point is, that there are also many naturally good singers as well. Even these with proper training could very easily, not only raise their level, but also reduce the amount of effort involved in sounding great.

By the way, if you’ve ever considered yourself a “less talented” singer than some, have no fear! Continue reading and you will be guaranteed to greatly benefit from what you’re about to learn. Are you interested in improving your singing voice? If so, consider the following:.
8 Vocal techniques that will help you begin improving your singing voice fast:

Vocal Tip # 1: Posture

Perhaps there’s another secret as to why your mother constantly reminded you to stand up straight.The truth is..it makes you a better singer. How? It’s vitally important to align your body parts and prepare them to support your sound, while eliminating tension. Tension not only makes you feel uncomfortable and affects your mood, but can greatly restrict air flow, making singing a chore rather than pure enjoyment.

Exercise: Find a wall and stand with your back to it. Place your head to the wall so that your chin is parallel to the floor. Open your shoulders and roll them back to the wall. Without allowing your spine to touch, slowly move your back towards the wall to straighten. Arms to your sides. Feet shoulder width apart, find your balance. Try to relax. The only tension you create should be in your abdominal muscles that are supporting your singing. It is more effective if you do this in front of a mirror. This can especially help you to visualize your stance after you see and feel proper posture.

Vocal Tip # 2: Breathing
Try holding your breath and singing or even speaking. You get the point. Clearly air is a major component to singing. When singing a melody, the words are expressed quite differently than if you were to simply recite the sentences aloud. The volume, the pitch, the tone, and the tempo can have you gasping for air before you know it.

Learning and mastering proper breathing is one of the keys to instantly improving your ability to sing. Unless we are exercising, normally our breathing is quite shallow. As we begin training our body to sing, we need to take deeper breaths in order to sustain our sound loud and clear for our listening audience. At first you may even feel a rush of dizziness as the deeper you breath, the more oxygen that gets to your brain. But don’t stress it! Your body just needs to get used to proper and more efficient breathing.

Vocal Tip # 3: Tighten That Drum

It is absolutely essential to proper singing technique that you understand how the diaphragm, lungs, and chest cavity affect your singing. Think of these 3 combined as forming a drum. A drum that is tuned loosely sounds flat and boring, as it lacks resonance. So the idea is to expand your rib cage by flexing the muscles that pull your ribs in and out. Effectively tightening that “drum”. This will result in better tones in your voice as well as increasing your lung capacity, allowing you to take less breathes between verses, resulting in better control. If you a serious about improving this area, it is suggested that you begin exercising these muscles.

Whether you join a gym or work out at home. Always consult a physician before starting such a program. The main muscles to focus on are your chest, arms, back, and obliques. Keep in mind that building endurance will allow you to develop a stronger voice as well as last for longer periods of time. Believe me, after singing 20-30 songs in a night, when performing, you need to be in good physical condition. Do not over look the importance of cardiovascular exercise to increase lung efficiency. You don’t need to become a body builder or a marathon runner. Just try and keep in shape. Good singing health to you!

Vocal Tip # 4: Water…Drink Tons Of It!

It doesn’t matter if you meet a heavy metal singer, pop singer, or an opera singer. You can bet any one of these true professionals can appreciate the abundance of good ole H2O. It’ll always be within arms reach whether they are in the studio, rehearsal, or on stage. Some prefer drinking warm water, claiming that it better refreshes your throat. Others swear that ice cold water can aid in keeping swelling down, especially after a killer belting performance. Regardless of your preference. Just drink lots of it!

Some think that gargling water can hydrate the vocal cords. The truth is that the no food or water comes in contact with them as they are located in your windpipe. When liquid goes down, the automatic flap called the epiglottis closes to protect your lungs from being filled with water. This also covers the vocal cord every time you take a drink.

What happens when you get water in your windpipe? It causes a choking gag reflex. So really, the only way to hydrate your vocal cords is to drink water. Why lots? It is because the water has to enter your stomach, and is first supplied to all your major organs, like your heart, kidneys, etc.. Eventually, smaller organs like your vocal cords are supplied. And supply you must! Note: avoid smoking and foods or liquids that dehydrate the body.

Vocal Tip # 5: Flex Those Facial Muscles

As with other vital muscles that support great singing. The neck and facial muscles play an obvious role. Really the goal is to minimize the effort required to sing so that you may effectively control your tone and your pitch. Warming up can not be avoided. There are mainly 10 groups of muscles in the neck, head, and face. Each consisting of numerous tinier muscles all working in harmony to create the beautiful sound making up your voice. Here is a list in order of the types of movements you can perform on various parts to prepare yourself to sing:

1) Yawn

2) Jaw Stretch

3) The Pucker

4) Silly Smile

5) Eye Brow Lift

6) Eye Roll

Vocal Tip # 6 : Find Appropriate Singing Material
Finding the balance between your preferred taste in music and your voice type can prove to be a challenge. You may love the high pitched screams of hard rock, but your voice may actually be better suited to pop or country. What do you do? It is highly recommended that you NEVER strain your voice to sound like someone else. Within your favorite genre, you need to find artists that have a similar range or try singing their song in a different key. The other option is to explore the other side. If you are a laboring to sing that power ballad in the car, then why would you want to butcher it while you’re on stage. Explore all your options. But the rule is..you MUST enjoy what you’re doing or it will never be worth the effort.

Vocal Tip # 7 : Practice…Practice…Practice

As you move from the casual singer in the car to progressing toward live performances, you need to appreciate the importance of practice. Not only your chosen songs repetitively but your strengthening skills that lead you to master your art. You need to know: where, when, and how long to practice. Where is an easy one. Somewhere that you will not be disturbed and will not disturb others. You should be able to move around in a comfortable space. Preferably where there’s a mirror. When to practice is based on your own availability and circumstances.

Have a set schedule. If you write it down on the calendar, you’re more likely to do it. What time of day again is personal. But keep in mind that you need to remove any and all distractions like the T.V., the internet, computer, or cellphone in order to maximize concentration. Also, have your materials organized and ready for each session. How long depends on your skill level. If you are new, it is recommended to limit your time to 20-30 minutes per day. As those muscles strengthen, you can gradually move up to 30-60 minutes per day. Be patient. Remember that anything worth achieving takes persistence and can never be rushed. But it’s so worth it!


Vocal Tip # 8 : Find Quality Vocal Instruction
Learning how to do something right the first time is so important. Reading books on singing can definitely expand your knowledge of techniques and practice skills, but can feel a little lifeless and A bore at times. Hiring a vocal trainer can also prove beneficial.

Monday, 29 May 2017

VOCAL EXERCISE


vocal exercises

Just like an athlete stretches his or her body and muscles before a big game or practice, a vocalist must warm up his or her singing voice before a performance or rehearsal! All it takes is 10 minutes with these five simple warm ups to maintain a healthy voice. Here are some of my favorite vocal exercises that will work for both beginning and advanced vocalists.


1. Lip Buzz
Simply vibrate your lips together, without pitch at first. It may take a while to get used to. This will help build up your breath support and stamina while singing. Next, try adding a pitch to your lip buzz, and holding it anywhere from 3-5 seconds. Pitch can go up, down, or stay on one note. There should be a funny, tickling sensation in your nose, and your other resonators (forehead, cheeks, etc.). If you do not feel this, try harder!

2. Solfege
We all should be familiar with “Do Re Mi Fa Sol La Ti Do” from the The Sound of Music! Starting on middle C, sing through the solfege up and down the scale, taking your time and really listening to each pitch. See if you can also try this warm up without a piano (acapella), as this will help with your ear training! Practicing solfege is not only a great tool for your ears, but it will also help with your sight reading

3. “Mah-May-Me-Mo-Moo”
Remaining on one note (monotone), sing “mah-may-me-mo-moo” nice and slow, really pronouncing the Ms. I would start low, perhaps at A3 and sing up the scale to an octave above. Really take your time, and see if you can sing this exercise all in one breath. While you don’t have to sing the warm up pretty, focus on the tone and your intonation to create the best vocal sound. Don’t push – this exercise should be nice and relaxed.

4. “I Love to Sing”
This is one of the vocal exercises you can use to help with your range, as it includes an arpeggio. Starting low at around Bb3, you are literally going to sing “I love to sing” with a smile on your face! You will start at the root, then hit the octave, and come back down on the 5th, 3rd, and root of the chord again. This is a great way to test your range through big jumps; it can be done fast and should be done in one breath. And smiling while you sing will help you with a more clear and bright sound – give it a try!

5. The Siren
This is the easiest vocal exercise of all! Think of the sound of a fire engine passing by, and imitate it with your voice. Start at the lowest note in your range, and slide through every note to the top of your range. If you can sing the low notes and high notes, then you know you are in good vocal shape! This is a good way to tell if you are vocally fatigued; if you are unable to hit the low or high notes, then it’s best not to sing and push too hard. You can try this warm up in reverse, too, by starting with your mouth opened up wide, going from high to low.

These vocal exercises take as little as 10 minutes a day, and will help you tremendously.

HOW TO READ GUITAR TAB


HOW TO READ GUITAR TAB


Guitar tablature, or just tab for short, is a notation system that graphically represents the frets and strings of the guitar. Tab is guitar-specific, and it tells you what string and fret to play. Use the tab if you’re ever unsure as to which fret or string a note falls on.


Music for guitar usually comes either in tab or with two staffs, one using standard music notation (the one with the treble clef), with a tab staff just beneath it, like most of the examples of guitar music you’ll find on this site. The tab staff aligns with and reflects exactly what’s going on in the regular musical staff above it, but it’s in guitar language.
The following figure shows a tab staff and some sample notes and a chord. Here are a few points to keep in mind when reading tab:
The lines of the tab staff represent guitar strings, from the 1st string on top (high E) to the 6th string on bottom (low E).
A numeral appearing on any given line tells you to press, or fret, that string at that numbered fret. For example, if you see the numeral 2 on the fourth line from the top, you need to press down the 4nd string (D) at the 2nd fret (actually, the space between the 1st and 2nd fret, closer to the 2nd metal fret wire).
A 0 on a line means that you play the open string — that is, unfretted, with no left-hand finger touching the string.
When you see stacked notes, as in bar 3 of the figure, that notation tells you to play the fretted strings all at the same time, which produces a chord. The fretted strings in the figure form a D major chord.

CIRCLE OF FIFTH


CIRCLE OF FIFTHS

Understanding how to read the circle of fifths will help you understand the relation between music’s major keys and their relative minor keys. A major key and its relative minor use the same key signature, which means they use the same sharps (indicated as #) and flats (shown as b) in their scales. When you read the circle of fifths, you’ll notice that the major keys are on outside of the circle. Opposite them, inside the circle, are their relative minor keys.


At the top, you have the key of C major, which has no sharps or flats in its key signature. Each stop on the circle as you go clockwise from C is a key with one more sharp than the previous key. Each stop as you go down counter-clockwise from C is a key with one more flat than the previous key.So, if you have the circle of fifths memorized (or have a picture of it handy), you can easily figure out what key a song is in. Simply count the number of sharps or flats in the key signature, and then move that many spaces around the circle of fifths, starting at C. Move clockwise for sharps, and counter-clockwise for flats.For example, if you see three sharps (F#, C#, and G#) in the key signature, start from C and go clockwise three places, and you’ll find that the song is in either A major or F# minor. Similarly, if you see five flats (Bb, Eb, Ab, Db, Gb) in the key signature (not a nice thing to do to a guitarist), you start at C and go five places counter-clockwise; that puts the song in either Db major or Bb minor.

OPEN CHORD POSITION


PEN POSITION CHORD


These 24 chords make-up just about all the chords you need for rock guitar in open position

GUITAR SOLOING AND DOMINANT SCALE


GUITAR SOLOING AND THE DOMINANT SCALE

Think back to the moment when you just learned to improvise on guitar and played your first licks in the minor pentatonic scale. It felt awesome to be able to play over a backing track, to create your own guitar solos and to express the way you felt by means of guitar playing. You saw your improvisation qualities improve rapidly and it felt like some kind of magic. As you mastered the minor pentatonic scale completely, you may have noticed that you got stuck and your soloing didn’t improve much anymore. In this article we will talk about a few simple techniques to break through these limitations and take your blues guitar soloing to a whole new level.

How Your Blues Guitar Frustrations Are Tied To a Very Limited View of How Blues Scales And Chords Work
You have learned about the minor pentatonic scale and learned to improvise a bit, but you’ve come to a point where you don’t make progress anymore. You want your blues guitar solos to sound like the ones played by your favorite blues guitarists, but you feel like you’re stuck in the same old patterns and licks. You know your guitar playing can improve, but you have no clue how to do it. Sounds recognizable? These frustrations are shared by many guitar players around the world! Let’s look at how this happens and how to overcome these guitar playing barriers.

Why You Are You Stuck In A Rut With Your Blues Guitar Playing
A large share of beginner and intermediate guitar players only make use of the minor pentatonic scale to solo over a dominant blues progression. Adding up to this, they use the minor pentatonic scale over ALL chords in this blues progression, which makes their solos sound less interesting and definitely not professional. Most of these guitarists think they’re doing it the correct way, but actually they only use a very basic method of soloing.


The minor pentatonic and the blues scale are the most common ways to play over a dominant blues progression, but these are definitely not the best ways of soloing if you want to sound like your favorite blues guitarists. If you want to break through your limitations and come a step closer to sounding like your favorite guitar hero, you need to explore more melodic ways of creating a blues guitar solo.


If you would like some more detailed reasons why using the minor pentatonic scale over ALL chords in a blues progression is not the best method of soloing, In this article specifically we’ll look at how to overcome these barriers by learning how chords and scales work together.


Overcoming Your Blues Guitar Frustrations By Understanding How Chords and Scales Are Related
To illustrate how chords and scales are very deeply intertwined, we start from a standard 12 bar blues progression in the key of A, with the following chords:
The most common and basic approach would be to improvise over this progression using the A minor pentatonic scale. To understand how this scale is linked with the chords being played, we’ll break down the A7 chord, which is a dominant seventh chord. Basically, such a dominant seventh chord is built up using 4 notes:


- The Root note (R) : A
- The major 3rd (3) : C#
- The 5th (5) : E
- The flat 7th (b7) : G


As the A7 chord contains these four notes, they are also a great choice to land on when soloing. They will sound really good, because these tones can be found within the chord. If you pick these notes to land on over an A7 chord, you will be able to give a more melodic feel to your lead guitar playing and your solos will have a lot more appeal to them. Depending on which of the four notes you pick, you will produce a different emotion. Try experimenting with different notes and listen to the feeling they give you!


As you may have noticed, the A minor pentatonic scale doesn’t contain the C#-note. That’s why we will use an expanded version of the scale to play over the dominant seventh chord A7: the A minor pentatonic scale with an added major third


A minor pentatonic scale (with added major 3rd)


It’s important that you realize that there are better options that we could choose than only using the minor pentatonic scale. Let me break it down for you why this is.


The A7 chord contains 4 notes, which we already looked at. You see these notes again in the left colomn below. In the right colomn you see the five notes of the A minor pentatonic scale.


As you see in the table above, the C# note in the A7 chord clashes with the C note of the A minor pentatonic scale. Try this out for yourself on your guitar, play a C note and play a C# note an octave higher; not the best sound in the world right?


Of course, a little dissonance never killed nobody and sometimes that dissonant C note might even be the perfect sound that we are after. But there will be times where you want to sound more melodically and you want to hit the perfect note at the perfect time.


Taking Your Guitar Playing to Blues Heaven By Applying Chord Tone Soloing


An approach that many great guitarists use to target the right notes over a chord progression is called “Chord Tone Soloing”. This means that you don’t play in one pentatonic scale over ALL chords, but you connect the chords being played in the progression with a certain scale. To clarify this, we start from the same standard 12 bar blues progression in the key of A as in the previous section.


First off, let’s take a look at what a lot of beginner/intermediate guitarists think is the correct way of Chord Tone Soloing. Further on, I will elaborate on the correct approach and teach you how to apply it correctly.


When Transposing Goes Horribly Wrong
For example, if in the progression above the D7 chord is being played, a possible (but WRONG) solution would be to play some licks in the D minor pentatonic scale over this chord instead of staying in the A minor pentatonic all the way.


To clarify this, take a look at exactly how this wrong assumption looks on the fretboard of the guitar:


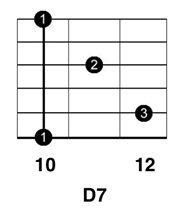
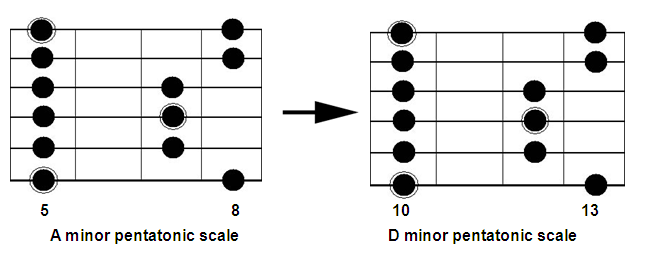
By transposing, you would be tempted to believe that the notes in the scale you are playing (the D minor pentatonic scale) will sound much better over the D7 chord than the notes in the A minor pentatonic scale. This again is a way of thinking that is common among beginner/intermediate guitarists, but definitely not a good approach.


If we analyze the D7 chord and the D minor pentatonic scale, we see that the chord contains an F#, while the scale comprises an F note. Hence, if the D minor pentatonic is being played over a D7, these notes will clash and it will sound horrible.
Just transposing the minor pentatonic scale over the D chord is done by A LOT of beginner guitarists, but NO professional blues guitarist would ever dare to do this! Are you starting to see why beginner blues guitarists get stuck in their progress on the guitar? They have no clue why their guitar playing doesn’t even come close to that of the guitarists they admire; they are using the WRONG scales!


How To Tie Chords and Scales Together So That You Are Picking The Best Possible Notes Over Each Chord


Applying what we explained in the previous paragraph, we can raise the F note in the D minor pentatonic to an F# and thus play the D minor pentatonic with added major 3rd, but there are even better ways. A more advanced approach that comes closer to how great blues guitarists apply Chord Tone Soloing, is to use the D dominant pentatonic scale. In that case we raise the F note to an F# and also play the 9th, which is the E note. This scale is completely tied to the D7 chord and therefore will sound much more professional when applied over a D7. All notes that are in the D7 chord are in the D dominant pentatonic as well. You can see this for yourself below.


This is the D7 chord:


And this is the D dominant pentatonic scale:


D dominant pentatonic scale


Notice how all the notes in the chord are covered in this dominant pentatonic scale.
Great blues guitarists will use the D dominant pentatonic scale when improvising over the D7 chord in a dominant blues progression. For example, here is a great Stevie Ray Vaughan lick you can use over the D7 chord:

11 MISTAKE GUITAR PLAYERS MAKE


11 MISTAKES GUITAR PLAYERS MAKE

Do you know how some guitar players practice most days of the week, work hard, and are passionate about their guitar playing, but they always struggle to be able to play guitar the way they want? They are frustrated because they don’t improve fast enough, begin doubting their guitar playing potential, or even feel discouraged or angry with themselves when thinking about how long it is taking them to become a better guitar player. 
Can you relate to that? I sure can;
There are specific reasons why guitar players go through such frustration and disappointment. Here are 11 key mistakes guitar players make and repeat over and over again that you should definitely avoid.
Teaching Yourself To Play Guitar. 
Many people attempt to teach themselves how to play guitar. Yes, it’s true that some well known players were ‘somewhat’ self taught, but I do not suggest following that strategy even if your favorite player was self taught. If you are 100% sure that you can build powerfully effective learning and training systems on your own, that's great. However, if you are like most of us, doing it alone is the hardest, most time-consuming, stressful, and frustrating way to learn anything. This is a mistake that you should avoid. Some guitar players think it will impress others if they say, "I am a self taught guitar player". That statement might impress a few inexperienced people, but being self taught is not a 'badge of honor'. Would you rather impress others with your guitar playing or with an unimportant statement about your guitar playing? I'm not criticizing self taught guitar players, I'm only saying that there is no advantage to being self taught… and no, it is not true that being 'self taught' makes us more 'original'. In fact, the opposite is usually true.
Taking Guitar Lessons From Ineffective Guitar Teachers.
 Unfortunately, most electric guitar teachers receive ZERO training on how to teach guitar. What is worse is that the vast majority of teachers do little or nothing to improve their guitar teaching skills. Want some proof? Use google’s keyword tool . Type in this keyword phrase: ‘improve guitar teaching skills’, ‘guitar teaching skills’, or ‘guitar teaching training’ and you will find that less than 10 searches per month are done for these topics at google! Of course there are some highly effective electric guitar teachers around, but there are a whole lot more ineffective teachers. 
Seeking New Guitar Information (tricks, tips, tab) Without A Proven Strategy To Reach Your Specific Musical Goals. We need information, advice, help and music to play, but without a proven strategic learning and training process that is specific to you, your skill level, your musical style and what you want to be able to do as a guitar player, information won’t get you where you want to go. It is better to first seek help in developing a customized strategy for you to become a better guitar player. After that strategy is in place, then it is time to deal with learning the right information.
Not Knowing Specifically What You Want To Be Able To Play. Most guitar players are not specific enough when they think about (or tell others about) what they want to be able to do with their guitar. To say, "I want to play whatever I wish to play” is too vague. How can you (or your guitar teacher) develop a specific and effective guitar training strategy unless the goals you have are specific? It's like saying you want to be a great athlete, how can you effectively train with such a vague goal? Sure there are things you can do to become faster, stronger, more flexible or whatever, but it's much easier if you first get specific such as, I want to train to be a gymnast, or a long distance runner, or a body builder. Yes you can still improve without a strategy, but it will take a lot longer and be much more frustrating. You can always change your goal later if you discover you want to do something else instead.
Not Enough Focus On Things That Matter Most To Making You A Better Guitar Player. Have you fallen into the trap of practicing guitar without focusing on the specific things that can quickly begin to improve your guitar playing? Many people really do not understand and apply this concept in enough detail…. for example, I have a student named Mark who used to take lessons from another teacher in the past. Mark was studying sweep picking arpeggios with his previous teacher, and was making some progress. However Mark did not understand what ‘specific’ things he needed to focus on first before attempting to master the sweep picking arpeggios he was practicing. This was holding him back and making him feel very frustrated. Mark’s previous teacher only knew how to ‘teach’ arpeggios and general sweep picking concepts. He did not really know how to “train” Mark with the specific things to focus on and how to overcome the challenges Mark was having. 
To your goals: In addition to not focusing on specific things, many guitar players focus on the ‘wrong things’. Some enthusiastic guitar players become temporarily obsessed with things which are distractions from other things that could be helping their guitar playing much more. Here is an example: I used to get so frustrated and angry when I could not play something perfectly, I’d lock myself in my guitar practice room and say, “I’m not coming out of this room until I master this damn lick if it takes me the next 19 hours! No breaks! No food! No human contact! I’m gonna nail this!” And I did master it. On the surface, it might seem like I was on the right track and practicing in a good way…. But in reality, I was spending my time only to stop being angry and frustrated. I was not investing my guitar practice time wisely by focusing on the things that mattered most to making a better guitar player. In other words, my perseverance was commendable, but my strategy to master important long-term goals was weak. I allowed myself to be distracted. I don’t make this same mistake anymore, and I urge you to also avoid it! Focus on the things that really matter for your guitar playing right now. If you are not sure how to do this, seek out a proven guitar teacher today.
Focusing On The Right Things, But in The Wrong Order. This is a common mistake that even many advanced guitar players make which causes a lot of wasted time and frustration. Imagine you want to improve your ability to create your own cool lead guitar solos. Let’s assume that you are advanced enough to truly understand all the primary and secondary elements of composing guitar solos (or you have a guitar teacher to help you). Each of the many elements need to be learned and/or practiced in order to easily create awesome solos that you like. Where should you begin? What should you focus on first, second, third? Which of these things should you practice simultaneously? There is always a specific order in which musical skills should be learned and mastered in order to EXPLODE your musical skills. Unfortunately, that order is totally different for every person, style of music, musical goal, skill set and knowledge, so giving an example here would be pointless. My advice, find the best teacher you can and study with him/her in order to be able to do what you want to do with your guitar much faster and easier.
Not Isolating Problem Areas. Few guitar players are aware of the small things that hold them back in big ways. Because these little imperfections seem insignificant to us, we often ignore them. The truth is, small hinges open big doors. In the video mentioned above I explained how allowing your guitar pick to lose its momentum when you are ‘not picking’ a note on the guitar makes your playing slow and sloppy…. which will make you feel very frustrated. This is why I was sure to make a special point to help you avoid that mistake
Learning And Practicing Guitar In A Step By Step Linear Process. Does following a linear step by step approach to learning, practicing and mastering guitar seem like common sense good to you? Yes it does… And that is why guitar players who follow such a path are NOT great guitar players. I’m going to let you in an insider’s secret… The truth is, following a linear approach to learning guitar, practicing guitar, and mastering guitar is the NUMBER ONE REASON WHY “GOOD GUITAR PLAYERS” STRUGGLE TO BECOME “GREAT GUITAR PLAYERS”…
Practicing Guitar In The Same Way Your Favorite Guitar Players Practice Guitar. 
Have you ever read about how your favorite guitar players practice guitar and then tried to repeat the same practice routine? Yes, I’ve made this mistake too! It seems natural to use a similar guitar practice schedule that our favorite guitar players are using. This is a mistake, because your current guitar skill level and knowledge of music is probably very different from your favorite player. His/her challenges and needs are likely not the same as yours.
Learning From Too Many Different Sources Of Information
There will always be many learning opportunities and various paths to take, but it is critical that you do not get distracted into following a piece of advice from one person, then another piece of advice from another person and then follow more resources from somewhere else and so on and so on... while different people may have some good ideas to offer, the fact is, distraction is a big reason why many guitar players who are actively learning, don't really move forward quickly... these people are always busy following totally different resources, teachers, philosophies, instructional videos, free online guitar lessons, but all of this leads them to take one step forward, then 2 steps to the right, then one step forward, then 3 steps to the left, then one step backward, then two to the right, then 1 step forward and then another step to the left.

TIP FOR DRUM SPEED


TIPS FOR DRUM SPEED

HERE ARE PRACTICAL TIPS TO HAVE IN MIND IF YOU WANT T O PLAY THE DRUMS FAST..........

1) Hydration

Not beer. Not soda. Water!
You need to stay hydrated when you’re doing anything physically demanding or else you’ll notice your performance take a nose dive. Remind yourself a take a few swigs in between songs! Keep those joints lubricated!

2) Breathing

When the majority of people do something strenuous, they’ll often hold their breath while performing the task. That’s generally not what you want to do when you’re doing this sort of physical activity for longer periods of time. If you don’t have oxygen in your blood, you’re going to cramp.

How do you get better at breathing? Try this: breath in for 4 counts, breathe out for 4 counts. You’ll notice that with slower tempo music, you’ll breathe very slow and deep. With faster music, you’ll be breathing a little quicker.

3) Being Aware

If you’re aware of a problem, you can fix it. Make a list of important things you want to keep in mind and even write a list on your snare drum! For example: breath, sit up straight, drink water, relax, and so on. If you’re not consciously thinking about these things, they can tend to float away on you.
Bonus Tip: Balance!
Balance is especially important when it comes to playing double bass. When one foot goes down, the other comes up. You’re constantly shifting your weight! This means you need to have a strong core and keep yourself centered on your throne so you don’t have to rely on your legs for balance.

DRUM RUDIMENT


DRUM RUDIMENT

Drum Rudiments are the most important aspect to drumming. They are the fundamentals to all percussion, and should not be ignored. A drummer should know all of the key drum rudiments, and be able to perform them without hesitation. Without the practice of these, you are limiting your skills and possibility as a drummer.Let’s break this down a bit, and look at why drum rudiments are so important to practice.
What Is A Drum Rudiment?Drum rudiments are basic drum patterns, used as practice exercises. They are basically the foundation of drumming, or the basics of stick control, and wrist movement. There are many different rudiments out there. You may hear some people talking about the 40 essential drum rudiments. This may seem like a lot however, most of these are just variations of each other. Drum rudiments should be practiced on a practice pad or a snare drum. They simply help train your fingers and wrists with speed, power, control, as well as independence.
Why Are Drum Rudiments Important?Practicing your drum rudiments as a drummer is a lot like going to the gym as a professional athlete. A hockey player must train his muscles to be able to skate faster, shoot harder, and hit harder. The same is for a drummer – we must train our muscles to hit harder, more accurate, and faster. This is where drum rudiments come into play. They force us to do nothing else but practice stick movement. A lot of times drummers will get side tracked on a drum kit and lose out on valuable practice time. Going through the basic exercises will drastically improve your skills on the drum set; allowing you to roll a lot faster, and giving you more options on the drum set.
Pros and Cons of Practicing RudimentsTo be honest, there are not a lot of cons to practicing these drum rudiments. As a drummer, you should be practicing these drum rudiments more often then you practice on a drum set. You can never go wrong by practicing your essential drum rudiments. The good thing about these is it will force you to go back to the core of drumming. Like I mentioned before, it is easy to get distracted with the drums in front of you, but when you are using a practice pad working on your rudiments, you do not have that option. However, that could also be a problem. Some may get used to the practice pad, and find it hard to transfer back to the drum set. Another problem with rudimental practice is it does not work on creativity, and independence on the drum set. Being limited to a single pad, you are unable to hear the different drum voices, thus hindering your creative edge.


Take your time to practice at least the 40 major rudiments, check the next article for that............

40 DRUM RUDIMENT


40 MAJOR DRUM RUDIMENTS

Like I have said before, there are many different drum rudiments to practice. In fact there are 40 rudiments in total. These can be all broken down five main categories: Single Stroke Rudiments, Double Stroke Rudiments, Diddle Rudiments, Flam Rudiments, and Drag Rudiments. Here is a list of all 40 rudiments. Remember to practice these rudiments with your brushes as well as sticks.

1. Single Stroke Rudiments
Single Stroke Roll
Single Stroke Four
Single Stroke Seven
2. Double Stroke Rudiments
Double Stroke Roll
Five Stroke Roll
Six Stroke Roll
Seven Stroke Roll
Nine Stroke Roll
Thirteen Stroke Roll
Fifteen Stroke Roll
Seventeen Stroke Roll

3. Diddle Rudiments
Single Paradiddle
Double Paradiddle
Triple Paradiddle
Paradiddle-Diddle

4. Flam Rudiments
Flam Stroke
Flam Accent
Flam Tap
Flamacue
Flam Paradiddle
Single Flammed Mill
Flam Paradiddle-Diddle
PataFlaFla
Swiss Army Triplet
Inverted Flam Tap
Flam Drag

5. Drag Rudiments
Drag
Single Drag Tap
Double Drag Tap
Single Dragadiggle
Drag Paradiddle #1
Drag Paradiddle #2

Single Ratamacue
Double Ratamacue
Triple Ratamacue

Other Rudiments
Multiple Bounce Roll
Triple Stroke Roll

TIPS FOR PLAYING IN CHURCH

TIPS FOR PLAYING DRUMS IN CHURCH

TIPS FOR PLAYING DRUMS IN CHURCH
90% of drummers starts playing in church either from childhood or when are grown up,there are tips every church drummer must know or have in mind ........

1. ITS ABOUT SERVING THE MUSIC

This is the golden rule. This applies to all music but it’s especially true here. It’s not about you coming and imposing what you think should happen in the music. Lay back and let the music breathe!

2. IT’S A GROUP EVENT

People come to interact and participate in the music whether it be traditional hymns or a full band. This means you need to approach what you play in a different way. In short: keep things simple. Make it easy for people to latch onto the groove of the song. It might be tempting, but don’t make things too complicated

3. WATCH YOUR FILLS

This isn’t saying you can’t do fills, but we need to make sure we’re using the proper fills in the proper places. For example, don’t play a big, bar long fill in the middle of a verse. This might work in other styles of music, but this will lead the audience to believe that you’re heading into the next part of the song. So as a general rule of thumb, keep your fills short and sweet unless you want to lead the listener to the next section.

4. YOU ARE THE LEADER

Remember… this is a group event. Every group needs a leader. The “song leader” can lead them with the lyrics, but you control the rhythm and flow of the song. We have to make sure everyone stays together and tight. If you notice someone in the band is lagging behind, try and help them by changing up what you’re playing and providing another firm anchor for them to latch onto.

5.DYNAMICS, DYNAMICS, DYNAMICS

Many churches enclose the drummer behind some sort of sound dampener. They do this to isolate the sound and in some cases, control the volume of a drummer who has poor dynamics. You have to understand the acoustics of the environment you’re in and be aware of who’s around you. Sometimes you need to make even further adjustments such as playing with special sticks!

BASS DRUM TIPS


BASS DRUM TIPS


Bass Drum Immersion
Many drummers have amazing hand speed and control, but still find it difficult to master basic single strokes on a double pedal. They work at it from time to time, but never quite get it to the functional stage. I believe this is because the development of pedal technique is largely absent in most beginner lessons.
It's a proven fact that kids at a very young age have a significant advantage when it comes to learning a second language - while teenagers that have spoken English for 15+ years find it more difficult. I believe this is because teenagers have gotten past the initial stage of development, and no longer *need* to learn in order to communicate. This would explain why French (or other) immersion classes are so effective. The student is forced to learn if they want to participate on any level.
I suggest you take a bass drum immersion class of your own. This is especially effective for double bass players, but also relates to single pedal drummers. Decide for yourself that virtually every beat or fill you practice for the next three months will incorporate some unique pedal work. Spend a good portion of your daily practice focusing specifically on bass drum development. Most importantly of all, do NOT stop or slow down until you have developed the ability to use your new found skill in a musical context. Work through everything until you are comfortable playing it in virtually any setting. Only then will it become a true ability.

Single Bass Drum Technique

At first, it may seem like you are at a disadvantage when playing a single pedal. However, I don't look at things that way at all. The simplicity of a single pedal setup can, in many ways, allow you to achieve usable results sooner. Better still, it's all the more impressive to play amazing hand to feet combinations using just one foot. This is used all the time in music styles like punk rock, and heavy metal rock!
I've got a special secret method for playing amazing hand to feet combinations that is an excellent alternative for single pedal drummers. More on that later...

Double Bass Drum Technique

Playing double bass, whether it be two bass drums or just double pedals, has a very different learning curve when compared to single pedal drumming. You will find that it takes twice as long to initially develop speed and control, however, things become significantly easier once you have the basics down. A concept or pattern that a single pedal drummer struggles with will often be fairly simple with two pedals. Beyond that, there are some things that just cannot be done without having a double pedal.
Imagine playing drums with a single hand. Yes, you can use methods like the Moeller or finger control technique to play fairly fast, but it just isn't the same. Likewise, playing with a single pedal can be limiting when you want to branch out into more creative drumming concepts (flams, single stroke or double stroke rolls, etc.).

Heels-Up vs. Heels-Down

Playing heels-up can be significantly easier when you are first learning to play, and thus many drummers become completely reliant on it. As I explained earlier with my second-language analogy - they just find it easier to stick with the one method that is already working perfectly. The line "if it ain't broke, don't fix it" comes to mind.
However, I think drummers that skip out on the heels-down method really sell themselves short. You see, playing heels-up uses many more muscle groups - including the same muscles used to play heels-down. Thus, it takes almost twice the energy to play a beat with that method.
I would encourage you to take up both methods. Playing heels-down will help you develop important muscles that will actually speed up your heels-up playing, and give you added control. It's like comparing finger control technique with using all wrists to play around the snare and toms. Yes, you get more power out of using wrists, but the fingers save energy and give you added speed. Develop both techniques to see best results.

Using Ankle Weights To Develop Speed

Using ankle weights when practicing drums is a relatively well kept secret in the industry. A few drummers, that I consider to be reliable sources, have told me that even Thomas Lang and Virgil Donati make full use of them to develop speed and control. I'm not sure why this isn't covered in instructional videos (that I have seen). You can draw your own conclusions, but I'm guessing they may want to keep a method or two quiet as to not give away all of their secrets.
Essentially, you want to wear the ankle weights as you practice both heels-up and heels-down. When you go to remove them after 20+ minutes of practice - it literally feels like your feet are floating on the pedals! It's truly a unique feeling.

Double Bass Synchronization

The key to achieving single stroke speed on double pedals is to find the sweet spot on both pedals. It's like the balance (or fulcrum) point in a drum stick that allows do the least amount of work. It is vital that both of your feet play at the SAME balance point. Don't get used to playing your left foot slightly different than the right. It will make it significantly more difficult to synchronize your singles at top speed - which adds one more hindrance to achieving your best result.

The Secret To Bass Drum Speed

Ever wonder how the world record speed of 1407 BPM was achieved with double pedals (23.45 strokes per second), or how drummers like Travis Barker play insanely fast hand-to-feet combinations with a single pedal? The secret is a simple method that, while difficult to explain in text, is really quite simple when applied to the pedal.
No, it is NOT some accessory you have to add to your pedals or lug around from gig to gig. This method can be played on any pedal (single or double bass) to produce fast double strokes with your feet. It's called the heel-toe technique.
Think of how you play the snare drum with your hands. Playing a double stroke roll allows you to play significantly faster than singles, and by incorporating doubles you can play many more patterns and rudiments that would be virtually impossible with single strokes alone.

The Heel Toe Technique

The heel-toe technique not only allows you to play doubles with ease, but it also allows you to play them with speed and precision that just cannot be achieved without it. You can use it with two pedals to play double strokes rolls, or on one pedal to connect fast hand-to-feet combinations. I still come up with new ways of implementing it on a regular basis.
If you want to learn this method the right way, I recommend you check out the instructional video on Jared Falk's Bass Drum Secrets web site. It shows the right way to play the technique by breaking it down step-by-step in slow motion video. It'll cost you less than an average drum lesson, and this technique will honestly revolutionize the way you look at playing drums. This bass drum speed technique will enable you to play the drums better than many drummer with your level of experience.

LEARN HOW TO PLAY DRUMS WITH A METRONOME

           Learn How To Play Drums With A Metronome The Metronome is one of the most essential tools used to develop a drummer’s sense of t...